


Ready, Set, Garden – Practically
March 26th, 2013
Now that we’re on the verge of another growing season (if winter ever decides to give up), I thought I’d share 10 of the most useful season-beginning, hands-on, work- and money-saving tips I’ve picked up over the years.
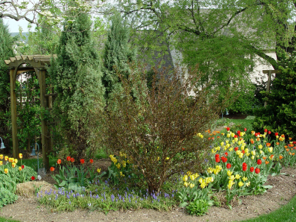
1.) Scout out your emerging colorful-leafed perennials for possible use in pots. Divisions of things like coralbells, hostas, Japanese forestgrass and golden creeping jenny mean fewer pot annuals to buy. Return them to the ground in fall. Pick out annuals that match your perennials.
2.) Standard advice for avoiding disease in flower pots is to clean pots each year, disinfect with a 10 percent diluted bleach solution and start with fresh soilless mix. Honestly, I’ve “cheated” and used the same potting mix two or three years running with the addition of maybe 10 percent homemade compost each spring, and I’ve never had disease problems. At least not yet…
3.) Put together an extra pot or two to set in any garden spots left bare later in the season when something dies, gets eaten or goes dormant (bleeding heart, Virginia bluebells, spring bulbs, etc.)
4.) Now’s the time to get your plant stakes and supports into place. It’s much easier to train summer floppers when they’re first emerging rather after they’re rambling all over the place.
5.) Grasses still standing? Clear the way for new growth and streamline cleanup by tightly bundling their midsection first and then cutting. The whole bundled thing will topple like a tree, which you can then carry away instead of gathering up a pile of fallen blades.
6.) Getting ready to fertilize or deal with weeds in the lawn? Fill that spreader over the driveway or other hard surface where you can clean up any spills. If you miss and dump a pile of granular fertilizer or weed-killer over the lawn, the concentrated load likely will brown out that patch. (Been there, done that.)
7.) If mulching the whole property is getting to be too much every spring, try splitting the job – half the yard in spring and half at the end of the season.
8.) Reduce mulching by underplanting trees and shrubs with low groundcovers, such as foamflowers, sweet woodruff and pachysandra in shade or creeping sedum, liriope or leadwort in sunnier spots. The living mat chokes out most weeds and saves work and mulch in the long run.
9.) Try cutting out or cutting back on any “just-in-case” spraying you’re doing this year. You may be surprised at how little of it you actually need – or how much trouble beneficial insects clean up when you give them half a chance.
10.) Don’t prune those early-blooming shrubs until after they flower (i.e. azaleas, forsythias, lilacs, weigelas, rhododendrons, etc.) Anything that blooms March through May formed its flower buds last year, so cutting now removes the flowers. It’s OK to prune later-blooming shrubs at the beginning of the season (butterfly bush, roses, caryopteris, summer-blooming hydrangeas, rose-of-sharon, etc.)

Thanks for this list! I still use your lists and advice even though we moved to outside of Chicago. Thank you for the gentle reminders of what we need to be doing each month. You make it so I don’t have to think to hard, just enjoy my garden!
Amy,
Glad it helps even you transplanted “northerners.” Hope you’re adjusting well out there. Be sure to spend some days at the Chicago Botanic Garden and Morton Arboretum — two excellent gardens even though they’re not in Pennsylvania. Happy gardening.
George
What a great list of to-do’s. But here’s a question… my mail order perennials have already arrived (foamybells, forest grass, coneflowers). Should they be going in the ground now too despite the cooler temps?
Good question, Karen. Some years it’s fine to plant perennials in early April, but both our soil and air temperature have been cooler than usual so far.
I’d acclimate the plants for at least a week or two before setting them in the ground.
Especially if they’re bare root (i.e. not in soil), pot them up and keep the pots outside in a protected area for the first few days. Then take them inside at night – particularly when the forecast is for below freezing.
Give them more outside time and exposure each day until they’re out all day and above-freezing night for four or five days in a row.
Assuming we’re warmed up to normal (50s in the day, mid to upper 30s at night) by then, go ahead and plant.
Mid-April is a lot better target to shoot for this year than early April.
George
How far back may I cut blue fescue grass clumps?
There are more brown stems showing than the pretty blue-green leaves.
Nancy,
You can cut back as far as an inch or two. Just don’t go down into the crown of the plant, the base where the blades grow out of. Now’s a good time to do the cutting.
George
July 29, 2013
Tart blueberries
Is there a nutrient I can add or discontinue to encourage sweeter berries?
There are 9, approx. 50-yr-old bushes, most if not all high bush, 3 or 4 varieties.
For the past 14 years, early each spring I generously sprinkle HollyTone or equivalent around roots.
In August, branches are pruned to keep them low enough to reach berries, and/or thinned.
They are healthy and bear well.
Thanks for any guidance you can give me.
I enjoy reading your columns in e-mail and the newspaper, and appreciate your humor !
That’s the right regimen, Nancy. The fact that your plants are still growing and bearing well after 50 years tells me you’re doing something right!
Some varieties of blueberries are naturally sweeter than others, but since all of yours are tart, that likely doesn’t explain it. Especially if your berries used to be sweeter than they are now, something else is behind it.
The three main factors governing sweetness are adequate sunlight, weather (especially moisture) and soil nutrition.
Sunlight-wise, is it possible that your bushes are getting less light now because nearby trees have grown and created more shade?
Weather-wise, berries are actually sweeter in drier years during ripening. The fruits will be smaller, but the sugars are more concentrated. In wet years, you might get bigger berries, but they’re usually a little more bland.
Nutrition-wise, flavor can be affected not only by the levels of various nutrients but also by the soil pH, which affects how well the nutrients are being broken down and available to the plant. If you haven’t done so lately, I’d run a soil test.
Do-it-yourself, mail-in Penn State University kits are available at most garden centers or for $9 through this web site: http://www.aasl.psu.edu/SSFT.HTM.
The ideal pH for blueberries is down around 4.5 to 5 – very acidic. Sulfur will get you back down there if the pH has been migrating upward. Holly-tone is a good, acidifying fertilizer, but it’s only mildly acidifying.
The soil test also will tell you if you’re lacking any key nutrients or if the mix is out of whack. The report will recommend what product to add in what amounts, specific to blueberries.
One other thing… I’ve found that the most common reason for tartness complaints in blueberries is that people harvest them too soon.
Berries are sweetest when they’re fully ripe – almost right before they start to rot. I’ve seen berries that look nicely colored but that are still a day or two or three away from being fully ripe.
Not all berries ripen at the same time either. So it’s possible to do a picking where some of the berries are sweet and some are tart from the same bush at the same time.
George